So it’s been a long night to bid 2018 farewell? Maybe we had a glass of Champagne too much? Or an awesome party with friends and a variety of mixed drinks? Are we feeling a bit hungover today?
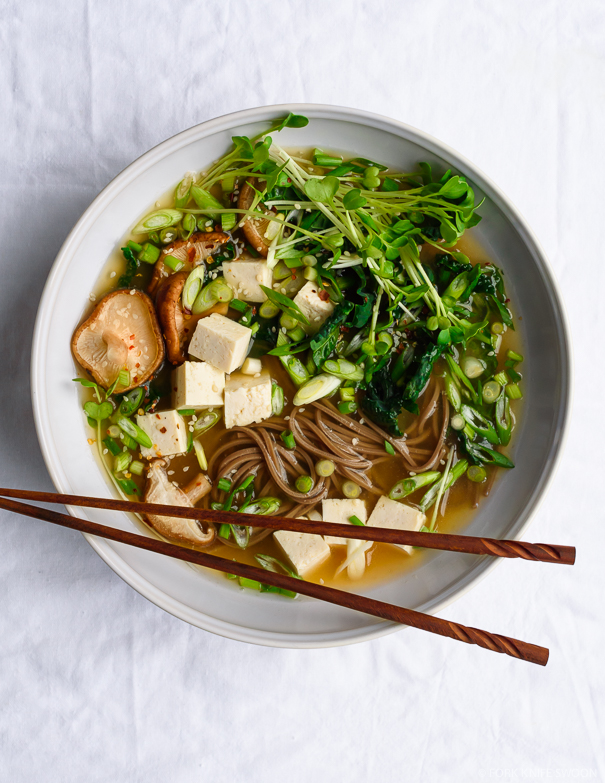
There is a nutritious and wholesome solution to get into shape – quickly! Rehydrating and soothing for an upset stomach!
small handful of radish sprouts, pea shoots, bean sprouts, etc.
sesame seeds and/or chili flakes, for serving
Preparation
Make the Broth:
Heat the oil in a large pot over medium heat and add the onion, garlic and ginger, and cook for a few minutes until softened.
Add the soy sauce, and stir to combine. Cook for another minute then add the stock, cover and bring to a boil. Remove the lid, and let simmer uncovered for another 10 minutes.
Ladle a half cup or so of the broth into a small bowl. Stir in the miso paste and whisk until dissolved. Pour the miso broth into the pot and simmer for a minute or two to heat through (but don’t let come to a boil).
Prepare the Ginger Miso Soba Soup:
Bring a large pot of water to a boil. Cook the soba noodles according to package directions, about 3 minutes.
Alternatively, cook the soba noodles in the simmering ginger broth, prior to adding the miso. Add the mushrooms and kale and cook for a minute or two to soften.
Are you joining Veganuary today? It can be scary but we’re here all January to support you! 2019 is the year become more Climate aware and active (read my recent post on the COP24 here). What better way than radically cutting your carbon footprint in January by taking the vegan pledge? It’s not only cutting your carbon footprint but minimising many other environmental malpractices, too. If you’re interested to learn more about the harmful impact on lifestock on the environment, we recommend you read this. Plant-power to you!
Leave us your contact details below, and we’ll ensure that you’ll receive a daily email in January 2019 with new healthy and nutritious plant-based meals from all over the world!
[wpforms id=”651″]
We’d love to hear how you’re getting on this month. Are you struggling? If so, what is the biggest challenge? Or did you find some genious hacks you’d like to share with the community? Please leave us your comments below.
Whilst many of us are still being jolly and in full festive swing, others are feeling the sense of bliss that this Christmas “madness” is coming to an end, and we can return to normality. Well, kind of… We’re now somehow getting caught in this limbo week between celebrations; the week between Christmas and New Year (for the Western world I admit).
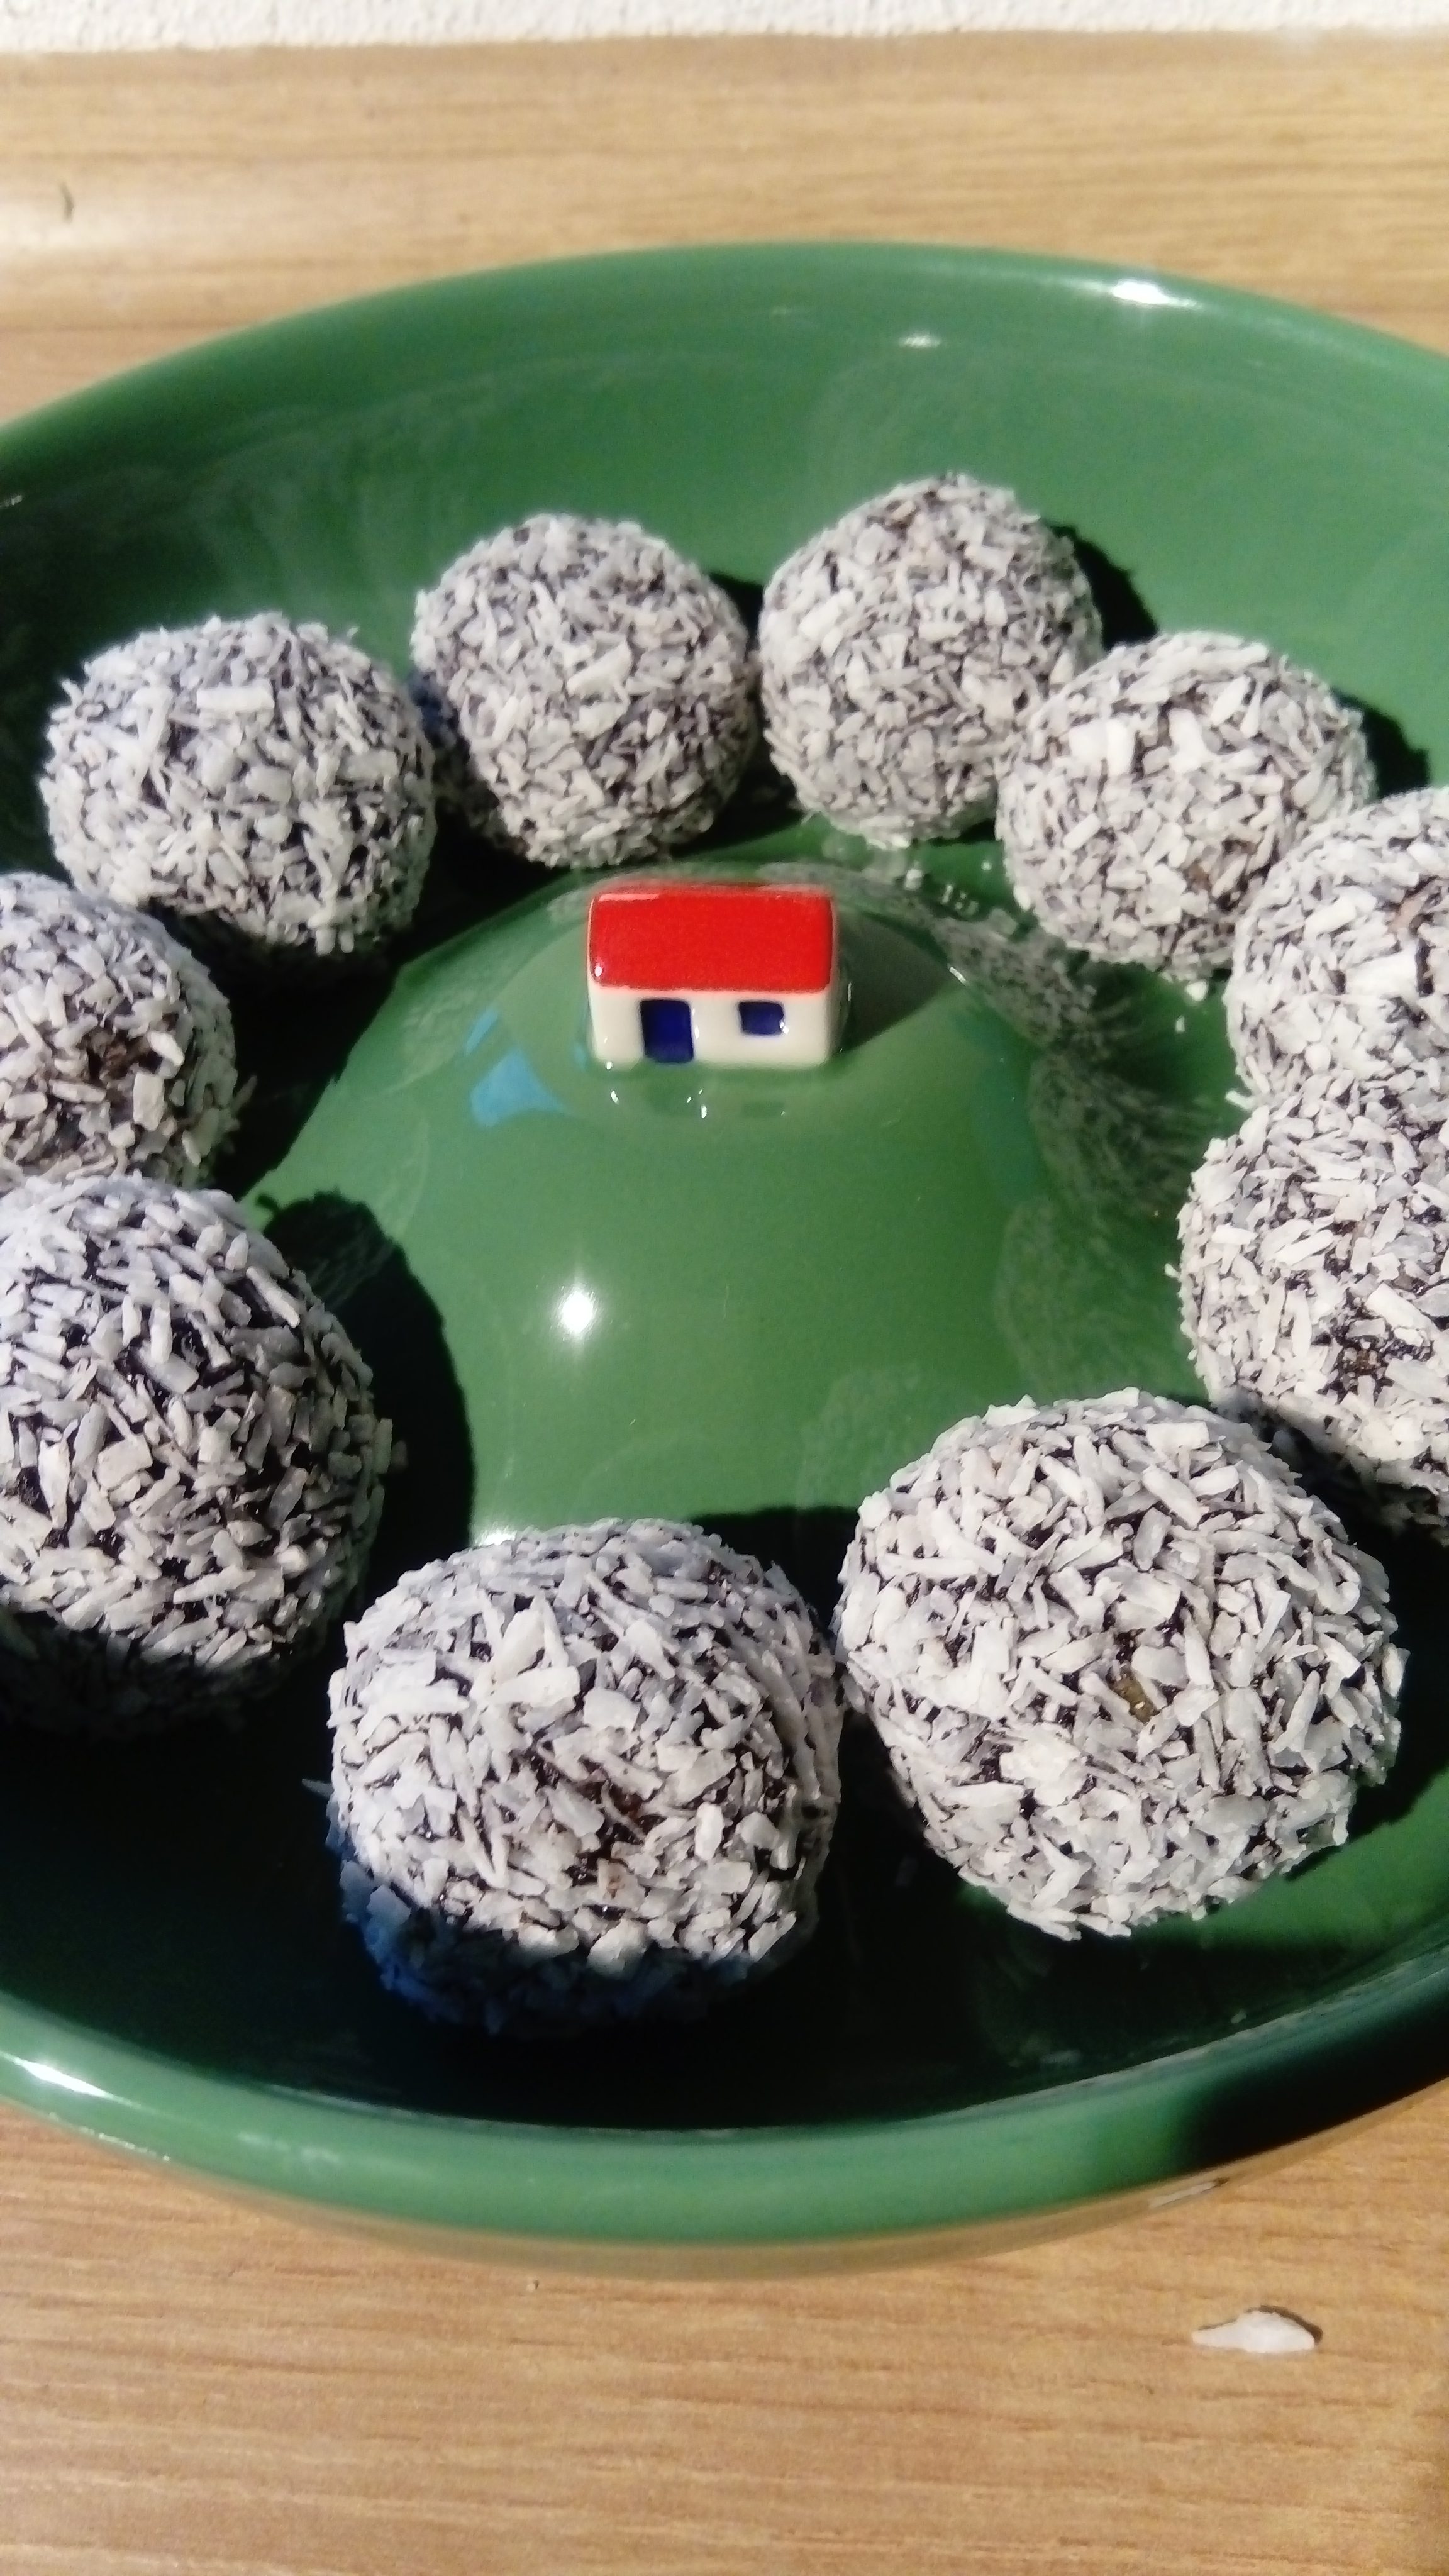
To prevent the “I don’t quite know what to do with myself right now”-blues, we came up with this delightful small Bliss Bites, in shape and appearance of tiny snow balls. They’re easy to prepare but you’ll get your hands and fingers sticky – that much of a warning upfront!
Ingredients
10 Medjool dates
1 Tbsp maple syrup
2 Tbsp melted coconut oil
1/2 tsp vanilla extract
1 tsp soakes chia seeds
1/2 cup nuts (almonds, hazelnut, walnut, brazil nut – any you like)
1/2 cup cocoa powder
For decorating: some desiccated coconut on a plate to roll the Bliss Balls in
desiccated coconut
Preparation
Place the dates and the liquid ingredients together into food processor, and blitz until you get a smooth paste.
Then, add the other indredients and pulse to mix all evenly.
Set aside in the fridge for the mix to cool down for at least 1 hour.
Using a tablespoon, scoop out an amount to form a walnut sized ball, rolling the mass between your hands – this is the sticky finger bit 😉
Roll the ball in the desiccated coconut until evenly covered.
Repeat steps 4 & 5 until all mass is used up. Place all Bliss Balls onto a dish and set aside in the fridge again to cool down.
Enjoy these home-made Bliss balls!
Do you like our plant-based inspirations? From Festive Feast to small snacks? Be the first to know when we upload a new recipe to our website! Please leave us your details below and you’ll receive an email each time we post new delicious plant-based dishes 🙂
[wpforms id=”651″]
Do you need any of our recipes translated into German, Spanish, or Portuguese? Please let us know in the comments below.
Let us be honest – Christmas dinners with the family can be stressful. Especially when we all have different dietary needs. I cannot think of a better opportunity though to share the wonderfully rich and versatile plant-based cuisine than Christmas. Sharing is caring, and what better way to show your love than preparing an epic Christmas feast that is cruelty-free, ethical, healthy, and environmentally sustainable!
Preheat the oven to 180ºC. Halve 4 pears (you’ll be using 1 for decoration), and place them all cut-side up in a large ovenproof dish.
Sprinkle over ½ a teaspoon of cinnamon and the caraway seeds and pop the 8 halves in the oven for 20 to 25 minutes, until they’re just browning at the edges and the flesh is soft. Allow to cool.
Place the walnuts and pine nuts on a baking tray and toast in the oven for 4 to 5 minutes – the pine nuts won’t take long to turn golden, so keep an eye on them. Set aside a few toasted pine nuts for serving.
Once the pears have cooled, scoop most of the flesh out of 4-6 of the halves (depending on how many person you’ll serve; 1 pear half per person), leaving just enough so the sides don’t collapse.
De-seed, de-stem, and chop up the other roasted pear halves and the scooped-out pear flesh, and pop in a food processor with the toasted nuts. Add the stem ginger and the rest of the cinnamon and blitz. If you want a paste that’s quite textured, blitz only for a couple of seconds. If you want it totally smooth, keep blitzing.
Divide the pear mixture between the 4-6 scooped-out pear skins. Peel and core the reserved pear, slice it thinly lengthways and arrange a couple of slivers on top of each stuffed pear.
Decorate with a few chopped toasted pine nuts and serve, warmed through or cold. It’s great with a little peppery salad, like rocket leaves, on the side.
Courtesy of Lisa Ballik
MAIN Smoky leek & hazelnut tart
Credit: Vegetarian Society Recipes
Ingredients
500 g ready-made vegan shortcrust pastry
4 leeks, trimmed, thinly sliced
20ml olive oil
3 garlic cloves, peeled, crushed
4 spring onions, thinly sliced
1 onion, peeled, finely sliced
2 tsp plain white flour
300ml soya milk
½ tsp vegan stock powder
a small pinch of clove powder
150g smokey or piquant vegan cheese
30g cranberries, broken into little pieces
1 Tbsp harissa paste
100g tinned roasted peppers, sliced
1 tbsp cranberry sauce
100g hazelnuts, roasted, chopped
¼ tsp smoked paprika
Salt and freshly ground black pepper, to taste
To garnish:
1 tsp fresh parsley, roughly chopped
¼ red pepper, finely chopped
¼ tsp smoked paprika
Preparation
Preheat the oven to 180ºC. Line a greased 28cm round, loose-bottomed flan dish with greaseproof paper. Roll out the pastry and use it to line the dish. Trim the excess pastry. Prick the pastry.
Cover the pastry with parchment paper, then add baking beans. Blind bake for 25 minutes. Remove the beans and paper, then bake for another 10 minutes. Leave to cool.
While the pastry is cooking, gently sauté the leeks in 10g olive oil. After 5 minutes, add the garlic and spring onions and fry for 1 more minute. Season with salt and pepper, then set aside.
For the cheese sauce, gently fry the onion in the remaining oil for 10 minutes. Sprinkle on the flour and continue to stir for 2 minutes. Slowly add the soya milk, a little at a time. The sauce should get thicker as the milk is heated. Add the stock powder and a pinch of clove powder. Cook gently for 5 minutes. Remove from the heat and add 100g vegan cheese and dried cranberries. Once the cheese has melted, fold into the cooked leeks. Season as required, then set to one side.
Spread the harissa paste onto the pastry base, then add the peppers and cranberry sauce. Top with one-third of the nuts. Carefully add the leek mixture to the pastry case, then top with the remaining Vegusto. Bake in the oven for a further 10 minutes.
Mix the remaining nuts with a little paprika, then season. Remove the tart from the oven, scatter the mixture over the top, then bake for another 5 minutes. Garnish with parsley, red pepper and paprika.
Courtesy of Lisa Ballik <3
SIDE Shredded Brussels Sprouts salad with Lemon dessing and Pomegrante
1/4 cup freshly squeezed lemon juice plus the zest of one lemon
1/4 cup extra virgin olive oil
1 Tbsp minced shallot
1 Tbsp maple syrup
1/2 tsp Dijon mustard
Salt and freshly ground black pepper
Preparation
Holding each Brussels sprout by the stem, slice into very thin slices with a mandoline or sharp knife. Toss in a bowl with the radicchio, kale, half the pomegranate seeds, cranberries, and nuts.
Combine the lemon juice, zest, olive oil, shallot, maple syrup, and mustard in a small jar (like an old jam jar). Season with salt and pepper. Seal the jar and give it a good shake.
Pour half the dressing over the salad and toss to coat evenly. Let the salad stand for 1 hour at room temperature or 2 to 3 hours in the refrigerator. Toss with the remaining dressing and sprinkle with the remaining pomegranate seeds just before serving.
200 g dairy-free dark chocolate (at least 75% cocoa)
700 g silken tofu
160 g maple syrup
1 lime , zest of
1 Tbsp vanilla bean paste
1 Tbsp dark rum
1 large pinch of dried chilli flakes
1 large pinch of sea salt
Preparation
Place a small pan over a medium-low heat, half-fill with boiling water, then place a medium heatproof bowl on top, making sure the base doesn’t touch the surface of the water. Break in the chocolate, then allow to melt, stirring occasionally.
Meanwhile, line a medium bowl with a clean tea towel. Add the tofu, bunch up the tea towel and squeeze out the excess moisture into the bowl.
Add the tofu to a food processor with the remaining ingredients and 1 good pinch of sea salt, then blitz for 1 to 2 minutes, or until smooth.
Add the melted chocolate and pulse until silky and combined.
Divide the mixture between little bowls (to make it extra special, I like to use a mixture of espresso cups and cute little glasses).
Pop in the fridge for 15 minutes to chill, then serve.
Combine all ingredients (apart from nutmeg and rum) in a food processor until well combined and then chill.
When ready to drink add rum and mix thoroughly, pour into glasses and sprinkle nutmeg over each glass.
No-egg “eggnog”
Still got room for more? Don’t miss out on our next plant-based recipe and leave us your details below. We’ll email you as soon as we upload a new recipe to our website.
[wpforms id=”651″]
Please let us know how any of the Christmas dishes have turned out for you! Take pictures and share them on your social with the #EpicVeganChristmasFeast, or leave us a comment below.
Wishing you all a very merry Christmas and a magical holiday!!!
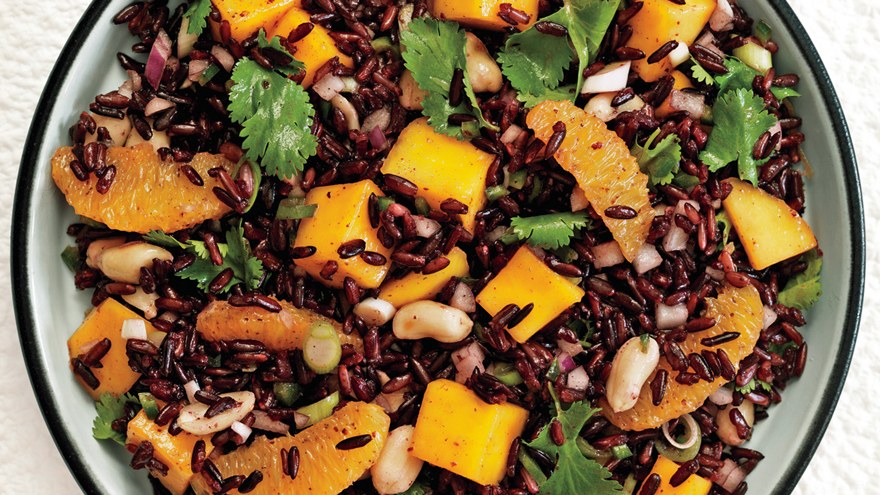
I get inspired by taking a look into my fruit bowl or vegetable tray in my fridge. Waste not, want not! Having discovered a ripe mango this morning, I got curious as to what I could prepare what is not the “typical sweet” dish I’d normally go for with a Mango – et voilà! This salad just looks beautiful and nutritious.
Huge shout-out to the growing community of vegan food bloggers in the www! I love the ease and convenience with which we can browse and find a recipe for pretty much every ingredient you have in your kitchen. If you want to save your food from landing in a bin -and honestly we all should have this desire not to waste- then I highly recommend you give this approach a try. Rather than planning meals and shop ingredients accordingly, why not try to buy what’s on offer at the moment, and then find out what you can cook with it? This turns the meal planning process upside down, and I quite like a good challenge! Do you?
This recipe is inspired by the Bon Appetit magazin, and I veganized it for us 🙂
Ingredients
1 orange, peel and white pith removed, segments separated
1/4 cup unsalted roasted peanuts (if you cannot find unsalted, use salted but leave out any additional salt in thie recipe)
3 spring onions, finely sliced
1 Jalapeño pepper, seeded, finely chopped
Preparation
Boil the rice in a large pot until it’s tender; appr. 20-25 minutes. Season lightly with salt (if you will use unsalted peanuts in this recipe).
Orange. Sharp knife. Large bowl. Small mason jar.
Use the small sharp knife, and cut the orange segments into 4 pieces each.
Pour 1/4 cup lime juice, oil, and No-fish sauce into the small mason jar, add some salt and freshly cracked pepper, put on the lid, and shake to blend. Set dressing aside.
Remove pot from heat and let stand, covered, for 15 minutes. Spread out rice on a rimmed baking sheet, drizzle with dressing, and season lightly with salt (if you will use unsalted peanuts in this recipe); allow it to cool down.
Add the diced mangoes and remaining ingredients into the large bowl, and then rice and toss gently to combine.
Season lightly with some salt and more lime juice, if desired.
Credit: Prevention RD If I’ll manage to make my dish just half as visually appealing as Nicole Morrissey, then I’ll be happy 🙂 What a beautiful job she’s done!!
Do you want to be amongst the first to know when we publish a new plant-based recipe? If you do, please leave us your contact info below, and we’ll drop you an email each time we add another delicious & nutritious post on this website 🙂
Smooth and creamy Whisky coffee liquor. Tempting solo on the rocks or enjoyed hot, stirred into a cup of coffee. It’s the time of the year, isn’t it? I’m not suggesting in the slightest that this “Baileys” version cannot be enjoyed throughout the year, but following the seasonal offers in our supermarkets, it seems to increase in popularity around the colder winter months. Specially around Christmas.
Moreover, if you enjoy giving home-made presents for Christmas, this is a really good one! Well, for +18 years youngs (or +21 years, depending on which beautiful place in the world you live in. Please follow your country’s legislation). You can get a beautiful bottle and get your Christmas present ready in probably 5 minutes. Sounds good to me!
All you need is….. love ? – and this:
250ml non-daily milk (I prefer coconut, cashew, almond, or hazelnut) If you prefer a thicker, creamier version you can use non-daily cream (soy or oat)
125ml Whisky
3 Tbsp Agave nectar
2gr instant espresso or 1 espresso stick (Anything but Nescafé please!)
1 tsp vanilla extract
1 tsp cocoa powder
Nearly there!
I’d suggest you use a large jug for the this recipe. Pour the Whisky into the jug and then add the instant expresso granules. Stir until its fully dissolved. Then add all other ingredients and stir until everything is well mixed.
Now, to ensure it’s tasty enough to give it away as a present, you may want to try. Pour yourself a small glass (or more ;)) and give it a try. How is it? I’d love to know what you think! Please leave us your comments below.
Variations
Thinking out aloud here, you may want to try some variations to this ‘basic’ recipe. What about hazelnut, mint, vanilla, or salted caramel?
It’s probably quite easy to add a tsp of salted caramel, vanilla or hazelnut flavouring, or a few drops of peppermint essential oil. If you give this a go, please share with us how it turned out 🙂
Keeping it cool
As this liquor s mainy bases on non-daily milk or cream, don’t forget to keep it cool after preparation. Keep it in the fridge for max 7 days. It should last the same amount of time as the original non-daily milk or cream. Obviously, the fresher it is, the better! As you can see from the recipe though, it’s a small portion anyway. It wouldn’t last 7 days in my fridge 🙂
Do you want to be amongst the first to know when we’re posting a new plant-based recipe? Please leave us your details and we’ll email you whenever we’re sharing a new recipe on this website.
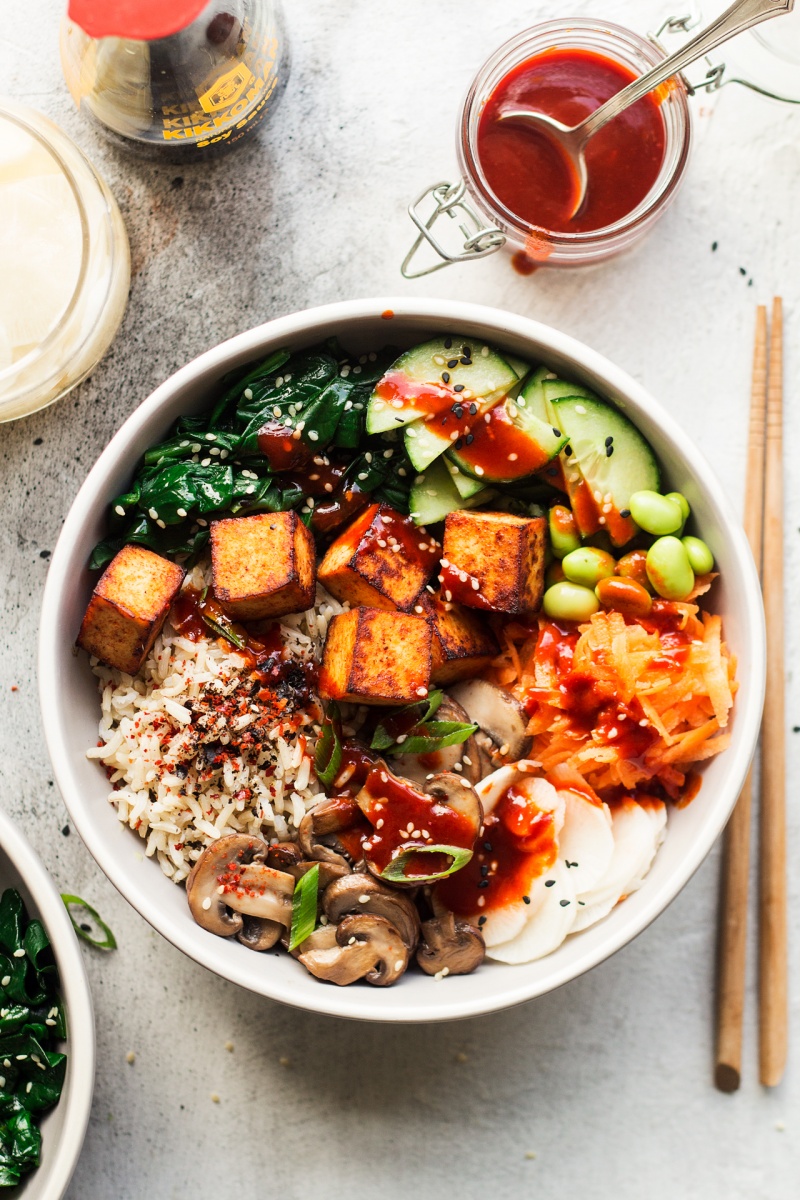
When I was in South Korea last year, I literally had bibimbap every single day. It may sound boring, as bibimbap means mixed rice. The good news is that you can mix in every ingredient you fancy. So, despite the fact I had mixed rice for over a week, I had differend rice mixes every day. Oh, I want to mention here as well that bibimbap always comes in a ‘decent’ portion size. Plenty and tasty! Food how I like it 🙂
Traditionally it’s cooked in a stone pot, the dolsot, which gets and keeps the bibimbap really really hot for a long time. I don’t own one (yet), so opted for the simplified version, using kitchen equipment we all own. I highly recommend you’ll try the dolsot bibimbap though, maybe next time you visit a Korean restaurant.
100gr mushrooms (Shiitake or mixed mushrooms if you can get them), roughly chopped into bitesize pieces
100gr spinach
1 carrot, shredded
50gr edamame beans
50gr bean sprouts
½ cup brown rice, cooked
½ long cucumber, finely sliced
1 spring onion, finely sliced
Some sesame oil and soy or tamari sauce to serve
This dish needs a bit of pre-planning, so different to my other recipes, which are quickly to assemble, this may need some preparation a day ahead.
Preparation
Press the tofu block.
Cube the tofu into bitesize pieces, not too large, not too small.
Slide the onion and set aside.
Place the tofu in a shallow bowl and pour soy sauce, mixed in with 1 tsp of Gochujang, over it. Set the tofu aside for at least 30 minutes to allow the tofu to absorb the marinade, making sure you turn the pieces to the other side at least once, halfway through. The longer you marinate the tofu, the more intense the flavour. I prefer to leave it marinating over night, but it’s up to you 🙂 Take the tofu out of the marinate and let the marinate drip off slightly.
Heat 2 tsp of oil on a non-stick pan, and place the marinated tofu cubes into the hot oil. Fry the tofu until golden brown on all sides. Be careful as the tofu is likely to splatter. Keep a splatter screen close by. If you don’t have a non-stick pan or want to reduce the amount of oil you consume, you can also bake the tofu. Set the oven to 180° C and place the marinated cubes of tofu on a . Bake for about 25-30 minutes, turning once, halfway through.
Cook the rice whilst the tofu is frying or baking in the oven.
In a separate pan, heat up 2 tsp of oil and throw in the sliced onion and roughly diced mushrooms. Fry them gently until they are nicely browned. Season with salt and pepper once fried to avoid the mushrooms releasing too much water during frying.
Remove the onions and mushrooms from the pan and set aside.
Throw in the spinach and a splash of water. Cook on a low heat, stirring from time to time, until the spinach wilts and most of the excess water cooks out. Season with salt and pepper.
Serve the rice in two bowls and divide all the veggies and cooked tofu between two bowls. Sprinkle some sesame oil and sesame seeds over, and top with thinned down Gochujang sauce. Add some soy or tamari sauce if you like.
In Korea the chopsticks are made from stainless steel. Not the bamboo or wooden material we normally are presented with when enjoying the Asian cuisine.
The spoon carries some importance if it comes to the bibimbap. It’s not actually eaten with the chopsticks. The chopsticks are used to stir the bibimbap, and the spoon is used to eat. After the mixing, the chopsticks merely fulfin the function of pushing the rice veggie mix onto your spoon, or placing the specific veggie or tofu pieces onto your spoon.
That’s it. My little Korean ‘Knigge’ for you 🙂 Now – dig in and enjoy!!
Do you like to receive our plant-based recipes as soon as they are posted on our site? We’re happy to email you as soon as we publish new recipes. Please leave us your details below.
I like this Moussaka, which probably differs from the classical Greek version we’re more familiar with. This is a moussaka stew, resembling the Lebanese Maghmour. It’s delicious as a side, even cold.
Simit
It’s perfectly accompanied by some Tabouleh, Hummus, and Simit! I always favoured the Middle Eastern cuisine because of it’s variety. Not to say that other cuisines are not rich in variety!
Tabouleh
All of the above named delicacies are currently on my dinner table, and that inspired my midnight post. As I love sharing meals, I invite you to enjoy this easy dish with me. Here it comes 🙂
Ingredients
2 aubergines/eggplants, diced
5 Tbsp olive oil
1 large onion, chopped finely
4 clove garlic, sliced or chopped finely
1 tsp sea salt
5 large tomatoes, skinned and deseeded
2 Tbsp tomato purée
1 cup water
1 tsp smoked paprika
1/2 tsp cayenne pepper
2 Tbsp fresh mint, finely chopped including stems
1 can cooked chickpeas, drained
Preparation
Place the aubergine/eggplant cubes onto a large baking tray and drizzle Tbsp of olive oil over them, mix or toss slightly until all cubes are slightly covered. Roast in the oven for about 30 minutes until browned.
Add the remaining oil to a large pan and add in the chopped onion. Fry on a low to medium heat until soft and slightly browning. Add in the garlic and cook for a further few minutes.
Next add the tomatoes, tomtato purée, paprika, roasted aubergine/eggplant, and chickpeas. Cook to approximately 20 minutes. Add water if needed. Finally season with salt and the fresh mint.
Enjoy with the recommended Hummus, Tabouleh, and Simmit – or other any variation of side dishes you like. Rice, couscous, lentils…the choice is yours!
Do you want to receive further plant-based culinary recommendations from around the world but are too busy to check into our website each day? We’re happy to send you and email each time we post a new recipe here. Please leave us your details below, and you’ll hear from us as soon as we’re uploading a new delicacy.
[wpforms id=”651″]
Would you like us to translate any recipe into Spanish, German, or Portuguese, please leave us a comment below. Of course, any other suggestions are welcome in our comments area too!
Christmas baking season has officially started! According to my family back home in Germany, that is. Let’s ignore the fact that supermarkets offered us their take on Christmas confection and baked goods shortly after summer! At least, that’s how I perceived it. If anybody was able to avoid the somewhat premature Christmas commercials and sweet offers until now – well done! Please teach me how to 😉
According to the last pictures that my mum sent, our family home was, as of last weekend, converted into a fully functional Christmas cookie factory with over 10 different varieties already baked, tinned, and available for consumption. Now is the time I wish I lived closer to my family 🙂
That doesn’t mean that cookie manufacturing is completed yet. Unless my mum has “manufacured” at least 15 different varieties and more than 5kg, she’s not done. I assume, from previous experience, that it’ll take another 2 weeks before the Christmas cookie ‘production’ ceases, and all cookies will be neatly stacked in colourful cookie tins in our cellar. It always astounds me how long it takes to produce them, and how quickly my family and friends invited for “pre-Christmas coffees” eradicate the stock! When it’s time for me to fly home for Christmas, I get to look at some remaining crumbles at the bottom of the tins, at best. Just enough to stick my nose in, smell the delicious aroma, and dream of the day that they’ll keep some for me. Maybe. Next year…
So – what is the lesson here for me?
If I want to enjoy some sweet Christmas treats, I’d be better making my own!
1 tsp gingerbread spice (I made the mix myself, find the recipe here)
3 Tbsp rum (if you won’t want to use alcohol, you can use rum aroma/flavouring, else, orange juice)
80gr of white vegan chocolate for the chocolate coating, and some dried cranberries, or any other dried fruit you’d like to use to decorate
Preparation
Chop the dark chocolate into small pieces and heat together with the vegan butter (or coconut oil) in a bowl hanging over a pot of hot water.
Set aside to allow cooling down a bit.
Use your hands to crumble the stale cake left-overs into a separate bowl. Break down the crumbs as finely as you’d like to have them in the rum balls later.
Now, add the melted chocolate into the cake crumb mix, and combine the two until you get a consistent mass. You can use a handheld mixer, if you prefer.
Slowly add the rum, rum aroma/flavouring, or orage juice. 1 Tbsp at a. time.
Form appr. 35 walnut sized balls from the mass and set them aside in a cool place (fridge) for about 30 minutes.
For the chocolate coating: chop the white chocolate into small pieces and heat in a bowl hanging over a pot of hot water. Set aside to allow cooling down a bit to avoid burning yourself in the next step!
Transfer the melted chocolate into a piping bag. Or use af reezer bag, and cut off a tiny bit of one corner. Now you can decorate the rum balls and place the drid fruit on top of the chocolate coating. Your finished rum balls will look similar to the ones in the picture below!
Place into fridge for at least 1hr until the chocolate sets.
Keep them in a cool place and allow them to come up to room temprerature 30 minutes before serving.
2 Cinnamon stars
That is without a doubt the most classical baked Christmas good you can imagine. Right up there with gingerbread and spiced biscuits ‘Spekulatius’. And who doesn’t like to star gaze around Christmas time? I’ll be focussing on Cinnamon stars for my personal stargazing event(s), considering that the UK cloud cover around this time of year doesn’t allow for anything else.
So, get your star shaped cookie cutter ready!
Ingredients
For the star dough:
200gr icing sugar
2 Tbsp ground cinnamon
8 Tbsp water
1 Tbsp lemon juice
150gr ground almonds
200gr ground hazelnuts
1 Tbsp freshly grated orange peel
For the star glazing 😉
Some icing sugar, ground cinammon, and water to get the right consistency to your liking.
Preparation
Mix all star dough ingredients in a bowl antil well combined. You should obtain a relatively firm dough ball.
Roll out the dough to the desired thickness on a non-stick, cut-resistant liner. *Please see my note below!
Cut out as many stars with your cookie cutter as your star dough allows you to.
Carefully transfer all stars onto a , or a greaseproof baking paper on a baking tray. Now, take the remaining dough, form a ball with it again, roll out, and repeat the process until you have used up all dough. Eat the rest – that is always an option 😉
Set the baking tray with all stars aside de for 4hrs to dry out slightly at room temperature.
Shortly before the 4hrs are up, preheat the oven to 250°C.
Place the baking tray and your beautiful stars into the oven and bake for 3-5 minutes only. You don’t want them to become too dry and brittle.
Remove the stars from the oven once done, and allow them to cool down before putting on the icing.
Mix the icing sugar with some cinnamon and a few drops of water at a time until you reach your preferred icing consitency.
Transfer the icing onto your newly born stars with a pastry brush. Just Glaze away!
Once the icing has set, you can either place them into a cookie tin for later consumption, or you can invite all your friends to your cosmic event. Cinnamon stargazing from the comfort of your living room! You will note, as quickly as the stars come out, as quickly they are gone!
*Note: I recommend not rolling the dough out too thin, as you’ll find it difficult to pick up the cut out stars when transferring them onto the , or greaseproof baking paper. Unlike the real stars, which cannot break, these cinnamon ones can.
Want more? OK, s’more it is!
3 UK S’mores cookies
I discovered this United States & Canada traditional nighttime campfire treat just recently. Two month ago, in hot and sunny Miami to be precise. Not the surroundings you’d necessarily connect campfires with. Since it was 35°C outside, and we had lunch in an air-conditioned hotel room, no campfire was included. It was immediately clear that we’re having a keeper here. I thought, if they can serve it in a tropical climate, I could easily steel the recipe and import it to the UK. I loved s’mores!
In order to keep S’mores vegan but modulate the wide array of S’more recipes available, I decided to give them a UK Christmas twist. So UK S’more cookies it is!
Ingredients
2 2/3 cups all-purpose flour
2 tsp cornflour
3/4 tsp baking soda
1/2 tsp salt
1 cup vegan butter or coconut oil, softened
1 cup packed brown sugar
1/2 cup granulated sugar
1 Tbsp chia seeds, mixed with 1/4 cup water
1 Tbsp vanilla extract
1 cup
1 cup
1 cup , crushed
Preparation
Mix the chia seeds with water and set aside for at least 15 minutes. The mix will form a jelly-like consistency.
Preheat oven to 175°C. Line large baking tray with a , or with greaseproof baking paper.
Dry ingredients: Combine the flour, cornflour, baking soda, and salt in a large bowl. Then set aside.
Wet ingredients: In a separate bowl, mix the butter or coconut oil, brown sugar, and granulated sugar until well combined. Add the ‘chia-jelly’, and vanilla. Stir to combine.
Combine the dry and the wet ingredients in the larger bowl, and mix until you get a smooth dough. Stir in the chocolate chips, the mini marshmallows, and the crushed digestives.
Form small walnut sized balls from the dough, and place them on the liner or baking paper. Place the tray in the oven and bake for 10-12 minutes, until golden brown.
Once ready, remove tray from the oven and allow the cookies to cool down a bit. They’re delightful enjoyed warm though!
Do you want to receive all our plant-based recipes as soon as they’re “out of the oven”? Served warm? Please leave us your contact details and we’ll ensure that you’re the first to know!
Merry baking ’til then! 🙂
[wpforms id=”651″]
Do you crave any other Chrismas cookie and want us to post the veganized version of it? Which Christmas treat would you like to see here? Or would you like us to translate any of our recipes into German, Spanish, or Portuguese? Please leave us your comment below.
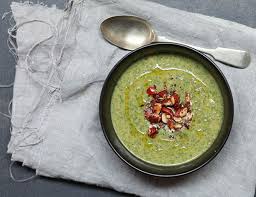
I previously spoke about the amazing health benefits of beans in my feijoada recipe; feel free to check it out! The health benefits, the recipe, or both 🙂 Since then I’ve incorporated black beans and kidney beans in my recipes. I think it’s time for butter beans. I’m aware though that people have mixed feelings about butter beans. Feel free to adapt to your liking with any other type of bean. Nutritional powerhouse beans – tick. Let us look at the next key ingredient: Kale!
Kale is amongst the most nutrient-dense foods per calorie on the planet! Hence, I always keep some type of kale in my fridge. It is loaded with Vitamin K, A and C, bursting with antioxidants, and a great source of sulforaphane. I decided to give the original recipe a little twist, and prepare the soup with ‘Cavolo Nero’, black cabbage.
Finding a recipe that contains both beans and kale, seem like a winner! My soup is simmering on the stove, spreading a wonderful aroma. I don’t want to keep you from experiencing the same joy!
Ingredients
A few splashes of olive oil
1 large onion, finely chopped
1 potato, finely diced (peel if you want, else, scrub it well)
1 carrot, finely diced (peel if you want, else, scrub it well)
3 cloves of garlic, finely chopped
½ red chilli, finely chopped (more or less, to taste)
1 sprig of rosemary, finely chopped
A pinch of ground cinnamon
The juice and zest of 1 orange
1 litre vegetable stock
2 x 400g tins of butter beans, drained and rinsed
4 large handfuls of cavolo nero, finely chopped (I prefer to to chop it with the stem, but you can remove it if you like)
A large handful of almonds, chopped
A pinch of chilli powder
A drizzle of agave nectar
Preparation
Heat oil in a large saucepan.
Once hot, add the diced onion, potato and carrot. Cook over a low heat until the onions are glossy and tender.
Stir in the garlic, chilli, rosemary, cinnamon and orange juice and zest. Cook until the orange juice reduces to a sticky glaze.
Add half the stock and the beans. Let it gently bubble until the potatoes and carrots are tender.
Add the Cavolo Nero and mix. Cook for a moment, until it is a lush bright green.
Whizz the soup with a blender or in a food processor until smooth, or serve chunky, adding stock as needed to reach the desired consistency.
Season to taste. Add more orange or chilli if needed.
Fry the chopped nuts in a little olive oil over a medium heat until just golden. Add a pinch of salt, a hint of chilli powder and a trickle of agave nectar, just enough to coat.
Once the agave nectar has formed a sticky glaze, remove from the pan. Scatter nuts over each bowl of soup.
Enjoy this wintery soup and get warm and cosy!
Interested in more healthy recipes? Or do you want to know when we upload new recipes to this website? Please leave your details below, and we’ll email you.
[wpforms id=”651″]
Please let us know in the comments if you wish any recipe to be translated into Spanish, German, or Portuguese. Do you have a specific ingredient you’d like us to include into an upcoming recipe? Please let us know below.
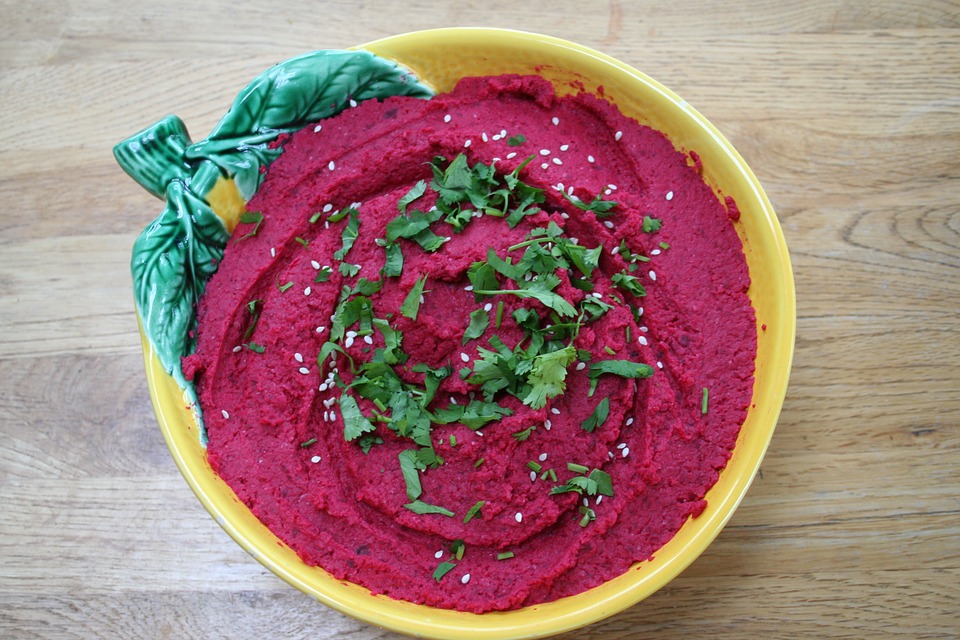
I think it is safe to say that we all agree that diet high in fruit and vegetables has well-documented health benefits. “Eat more processed food and animal products” said not doctor ever. But have you heard of ‘functional foods’? I, until recently, hadn’t. Functional foods potentially have positive effects on health, which go beyond basic nutrition. They actually promote optimal health and help reduce the risk of disease. That doesn’t mean though you should replace your healthy balanced diet with functional foods exclusively, but including them regularly in your diet is probably a good idea.
The red beetroot, or “Beta vulgaris rubra” is such a functional food. Quite some studies have been conducted in the past decades to find out more about its application in health and disease. Beetroot is rich in bioactive compounds. As such, it is particulaly effective in targeting chronic inflammation.
I talked about chronic inflammation as a precursor for obesity in my recent article about air pollution. I now wonder if people living in cities with high air pollution levels may want to include more beetroot and anti-inflammatory foods to balance the effects.
Let us start with an all beloved dip: hummus. Or for reasons above, beetroot hummus.
Ingredients
1 tin chickpeas, drained and rinsed
¾ tsp salt
½ tsp ground cumin
1 small garlic clove, minced
1 cup sliced beets (fresh or from a tin, as you prefer)
1 Tbsp lemon juice
1 Tbsp extra-virgin olive oil
optional: 2 Tbsp of catpured liquid from chickpeas (first add 1 Tbsp, if you prefer thinner consistency, add more)
Preparation
Pour the liquid off, capturing half of it in a small bowl. Rinse the chickpeas shortly with water.
Place all chickpeas in a food processor, adding the salt, cumin, garlic, and beets. Turn the processor on to break up the mixture.
With the food processor running, pour in the lemon juice and olive oil, and let the processor run until the mixture is smooth. Optional: add some of the liquid from the chickpeas for a thinner consistency.
Serve with veggies of your choice. I love carrot sticks and celery sticks with it! It’s great in tortilla wraps, on sandwiches and crisp bread too.
If you like to get more ideas for plant-based breakfast, lunch, dinner, and snack recipes please leave us your details below. We will informyou as soon as we share a new post on this website.